Crazyswarm2 Setup in Highbay
High-Level Steps
- Turn on the VICON (just flip the switch and wait for it to turn on!)
- Connect to VICON on the machine (run
ros2 launch mocap vicon.launch.xml) - Position and turn on drones and plug in the Crazyradio
- Run program (a few times if needed)
- Retrieve drones and charge (if needed)
(1) Turn on VICON
The best guide on how to turn on the VICON is here. JUST FOLLOW STEPS 1-4 since we will be using the single-marker method. Make sure that the setup is live and looks a little like below:

(2) Connect to VICON on the machine
To allow Crazyswarm2 to access the information from VICON, run this in a terminal on the highbay machine:
ros2 launch mocap vicon.launch.xml
It should successfully connect to the highbay machine and you should get latency readings. Make sure to keep this running in the background when running programs!
(3) Position and turn on drones and plug in the Crazyradio
Plug in the Crazyradio into the desktop! Either Crazyradio works and any port works!
Check out crazyswarm2/crazyflie/config/crazyflies.yaml. The top of the file should look something like this:
robots:
  cf1:
    enabled: true
    uri: radio://0/80/2M/E7E7E7E701
    initial_position: [0.0, 0.0, 0.0]
    type: cf21

  cf2:
    enabled: true
    uri: radio://0/80/2M/E7E7E7E702
    initial_position: [0.0, -1.0, 0.0]
    type: cf21

  cf3:
    enabled: true
    uri: radio://0/80/2M/E7E7E7E703
    initial_position: [0.0, 1.0, 0.0]
    type: cf21
To use less Crazyflies, change enabled: false. The axes of the highbay are like so:
       -x
        |
        |
        |
-y ------------ +y
        |
        |
        |
       +x

              ----------------
              | Control Room |
              ----------------
The control room box is where the computers are located (in the far +x, +y side). The below assumes you're at the control room box facing the -x direction.
With the config file above, that means the crazyflies must be oriented like so:
    -------                      -------                      -------
    | cf2 |   |-- 1.0 units --|  | cf1 |   |-- 1.0 units --|  | cf3 |
    -------                      -------                      -------
You can tell which crazyflie is which based on the number written on tape on the bottom of it. For example, under cf1, there is a tape with the number 1 and it corresponds to URI radio://0/80/2M/E7E7E7E701.
The ends of the table is about 1.0 units (technically a little more but that's okay). Place the crazyflies on opposite ends of the table and make sure it is flat. Orient the crazyflies with the red and black battery wire facing the -x direction (away from the control room). Alternatively, you can think that you should align the front of the drone with the +x axis (facing towards the control room).
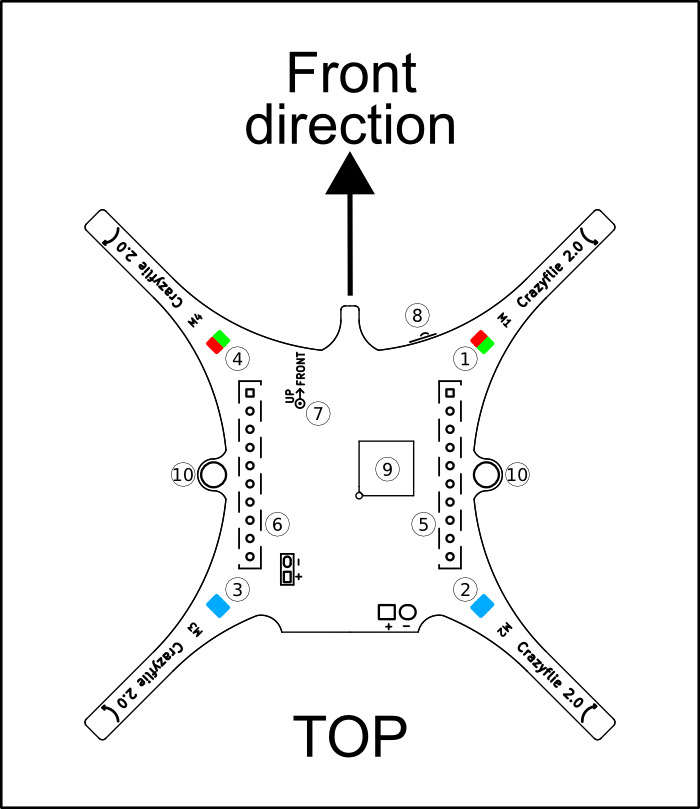
Finally, turn on the drones. Firstly, make sure NO CRAZYFLIE PROGRAM IS CURRENTLY RUNNING. Then press the button power button for both drones (order and timing doesn't really matter). The power button is what's labelled the "reset button" below.
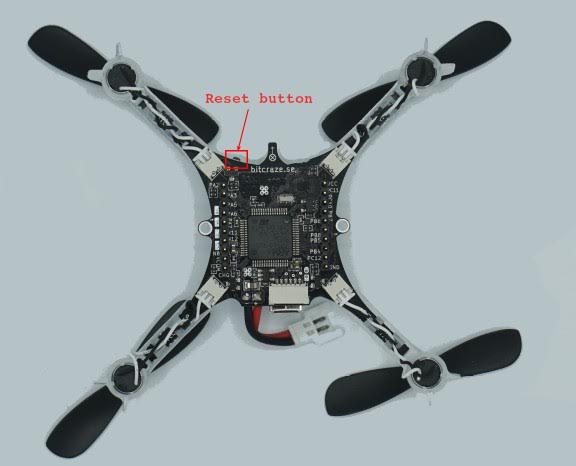
The crazyflie will automatically test all its motors by gently spinning them. If this does not happen within a minute of turning on, try again (and make sure no program is currently sending it signals)!
Finally, close the velcro around the net so the crazyflies don't crash without the net!
(4) Run program (a few times if needed)
Execute the program. Check out the info here!
You may need to execute it a few times before it successfully connects (if it doesn't do anything after about a minute, then it's almost certainly not connected so just rerun it!). If it fails a ton of times or keeps on getting stuck at some part, restart the crazyflie.
Here's a small compilation of errors I've run into and actions:
| Error | Action |
|---|---|
Stuck on Requesting memories... |
Unplug and Replug the Crazyradio or Restart the Crazyflie |
(5) Retrieve drones and charge (if needed)
After the crazyflies do its thing, you'll need to retrieve them! I go under the net and try to grab the crazyflies out of one of the many holes in it.
To charge the crazyflie, connect it to a laptop using the USB-A to micro-USB cable. Make sure the battery is still plugged in. Turn on the crazyflie. It should have two blue lights with one of them flashing. While the light is flashing, it's being charged. If it's solid, it's done charging. REMEMBER: turn off the crazyflie before running code since it can still recieve signals while charging!!
Debugging
My crazyflie automatically crashed out when trying to do anything (hello_world, etc.)
The axes are probably incorrect. Recall:
       -x
        |
        |
        |
-y ------------ +y
        |
        |
        |
       +x

              ----------------
              | Control Room |
              ----------------
Make the front of the drones facing +x. Also recall the position of the crazyflies (doesn't need to exactly 1.0 but roughly, about a table apart):
    -------                      -------                      -------
    | cf2 |   |-- 1.0 units --|  | cf1 |   |-- 1.0 units --|  | cf3 |
    -------                      -------                      -------